Reply-to addresses in Messages determine where replies to your messages land. Adding a new address requires the site to be live, and each address must be verified via email before it can be used. Permissions can optionally be set to control which admin groups can select specific reply-to addresses.
💡Quick answers
- Where are reply-to addresses managed in Composer? In the Messages module > Settings > Reply-To Addresses section.
- What must be true before a new reply-to address can be added? Your site domain must be live; reply-to addresses cannot be added or verified on a deployment/staging domain.
- How is a new reply-to address verified? After adding the address, a verification email is sent to it; click the link in that email to confirm and activate the address for use in Messages.
- Can reply-to address access be restricted to specific admin groups? Yes; use the optional Permissions step in the reply-to settings to control which admin groups can select that address when composing messages.
Managing reply-to addresses in your messaging system is a crucial task. This guide will walk you through the steps to add, verify, and assign permissions for reply-to addresses, ensuring smooth communication and proper access control.
Here's how it works.
In this article
- Step 1: Confirm your site is live
- Step 2: Add a reply-to address
- Step 3: Verify email address
- Step 4: Confirm email to complete process
- Step 5 (Optional): Assign permissions
⚠️ Important Note
-
Messages access: If the airplane icon in your Composer navigation is greyed out, the Messages module is not currently active for your site.
To ensure your reply-to addresses are correctly configured for other areas of your site (for example, when you are configuring your submission email reply-to settings in Forms), please contact Finalsite Support for assistance.
Site status: Reply-to addresses cannot be added or verified until your site domain is live. If verification is failing, please ensure your site has officially launched.
Step 1: Confirm your site is live
Reply-to addresses cannot be added or verified until your site domain is officially live and public.
Verification often fails during the implementation phase because the necessary security connection (DNS authentication) cannot be completed until after the site goes live.
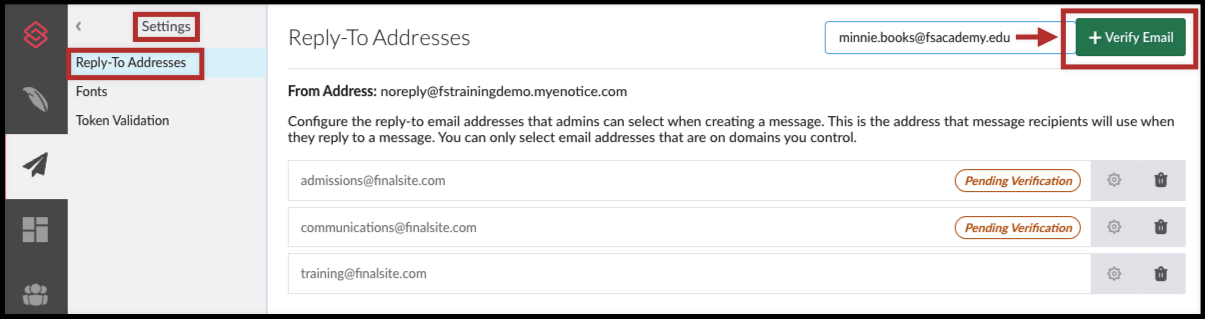
Step 2: Add a reply-to address
Admins with Settings access can add any address to serve as the reply-to address on a message. Here's how to add a reply-to address.
- Navigate to Messages > Settings > Reply-To Addresses.
- Click Add New Email Address in top right corner.
- Enter the Email Address you would like to be added as a reply-to address
Step 3: Verify email address
Click the green + Verify Email button to start the process. This will send the address a verification email.
Step 4: Confirm email to complete process
Addresses must be verified before they can be used.
The owner of the address will receive an email and must click a confirmation button.
Step 5 (Optional): Assign permissions
Once the address has been added, verified, and confirmed, admins may wish to assign permissions for who can use that address by clicking on the settings icon that appears.
Comments
Please Sign in to leave a comment if you don't see the comment box below.